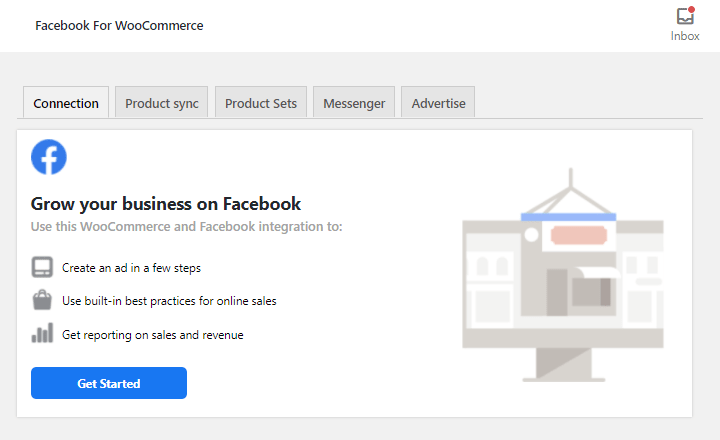
If you are using WordPress and WooCommerce to sell products on your website, connecting your online store to Facebook and Instagram can give a boost to your eCommerce business.
Why Connect WooCommerce to Facebook and Instagram?
Social media is really popular. Millions of us use it in Australia and nearly one third of use check our profiles on one or more platforms more than 10 times a day.
Facebook has long dominated social media and a number of challengers have come along the way. Twitter, Snapchat, and more recently Tik Tok. 89% of us on social media are using Facebook. 54% use YouTube and 45% use Instagram.
Facebook is also becoming a place to search for and research products, not just social media. If you have someone looking at your products on your Facebook page, you want to make it as easy as possible to get them onto your website to make a purchase.
The Facebook for WooCommerce plugin synchronises your website WooCommerce online store to your Facebook Shop. When a potential customer is interested in your product, the shop sends them to your store to make a purchase. Facebook owns Instagram and the plugin happens to synchronise products to both Facebook and Instagram.
As you add new products, change the details of existing products, update prices, and set specials during a promotion, the Facebook for WooCommerce plugin updates it on Facebook and Instagram, saving you having to update it in multiple locations. If you have more than a few products, this alone can be a huge time saver.
Install the Plugin
Before beginning, install the plugin “Facebook for WooCommerce” by Facebook. It is important that it is the one by Facebook, as the extension by WooCommerce has the same name, which can be confusing.
This tutorial doesn’t cover the differences between the two or explore which is better than the other. However, the tutorial is based on “Facebook for WooCommerce” by Facebook and won’t make sense if you are using another plugin.
When the plugin has been installed and activated, you will find a Facebook sub-menu under WooCommerce’s Marketing menu.
Connect WooCommerce to Your Facebook Page
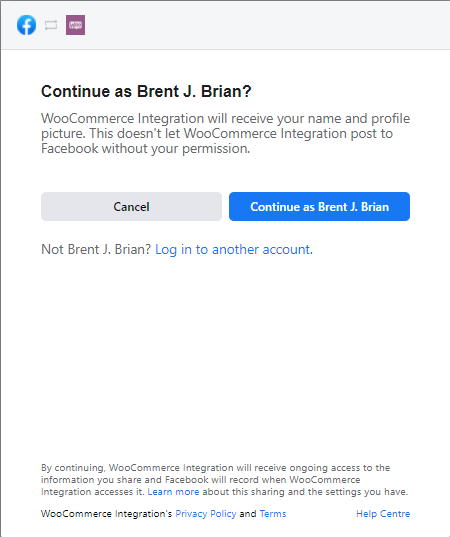
1. Facebook Account
When you are ready to connect your WooCommerce online store to Facebook, click on the Get Started button. You will be asked to log in to Facebook or if you are already logged in, confirm you want to continue with the account.
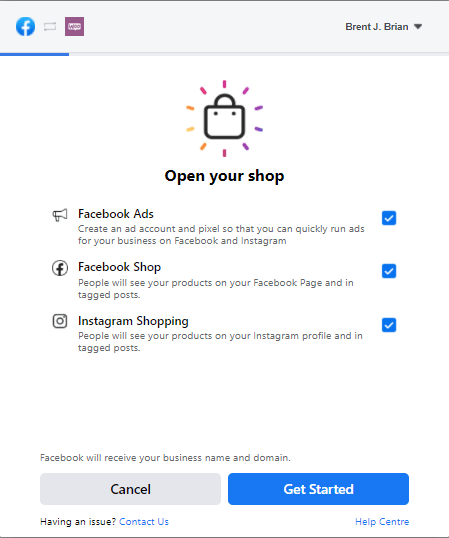
2. Select Features to Connect To
Select which features you want to connect your WooCommerce shop to.
Facebook Ads
Creates a Facebook pixel which lets Facebook analytics work out the effectiveness of advertising on Facebook to actions on your website. This is not essential for the shops but has value when you advertise on Facebook.
Facebook Shop
Probably why you are here. Your products on your online shop will be shown on the Facebook Shop too.
Instagram Shopping
Owned by Facebook, Instagram can reach a different audience. Instagram is more oriented to pictorial posts so it can be more engaging if your products are visual than something that is primarily functional. It must be a business account. If you don’t have one it is easy to create a new account or you can add it later.
3. Select Facebook Business Manager Account
Select the business manager account for your Facebook page. You don’t have to be an admin of the page but you will need to have permission to access the page from a Business Manager account.

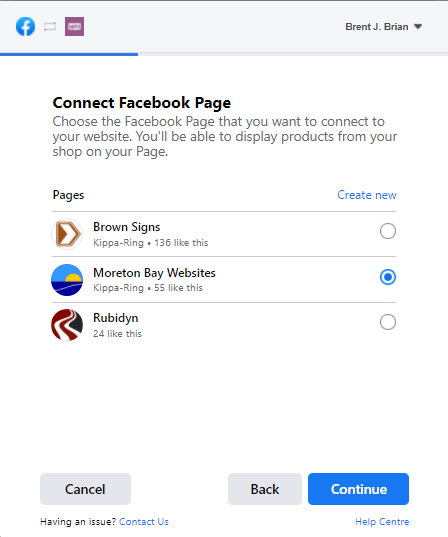
4. Select Facebook Page
Select your Facebook Page for the products to appear on the Facebook Shop. Pages you manage from your Facebook Business Manager account will appear in the list.
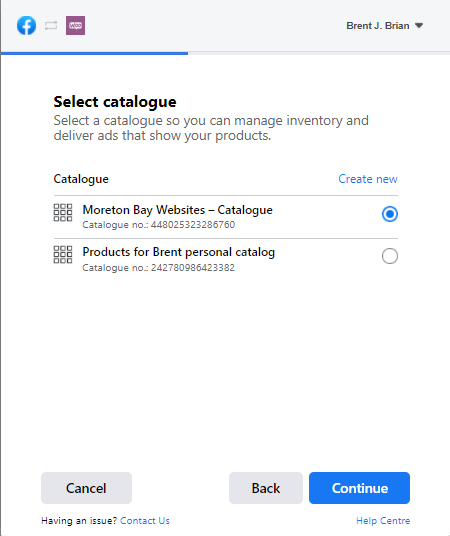
5. Select Facebook Shop Catalogue
Select the catalogue in the Facebook Shop for the products to be listed in. For a new shop you possibly don’t have a catalogue yet. Click on Create new to create a new catalogue, then select it and continue.
6. Select Facebook Pixel
Select the Facebook Pixel that is being used on your website. If you are not already using a Facebook Pixel, click on Create new to create a new pixel, then select it and continue.
The pixel is used to measure results from Facebook Ads by understanding the actions a user does on your website after the ad has been displayed to them.
7. Confirm Settings
After selecting all of the settings, a summary is shown with the selections made before connecting it all together.

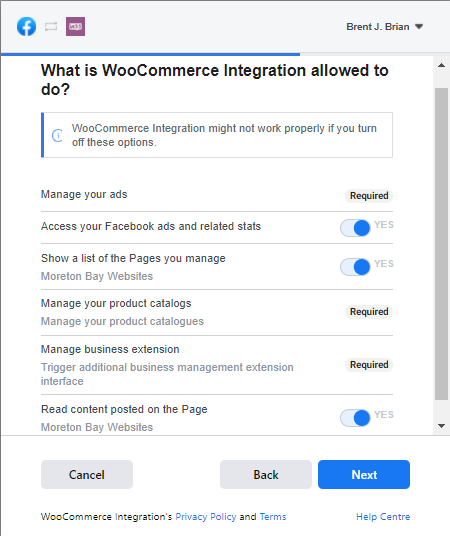
8. WooCommerce Interegration Permissions to Facebook
Select the permissions you want to give the Facebook for WooCommerce plugin. When you click Next, the attempt to connect WooCommerce to Facebook (and Instagram if selected) begins.
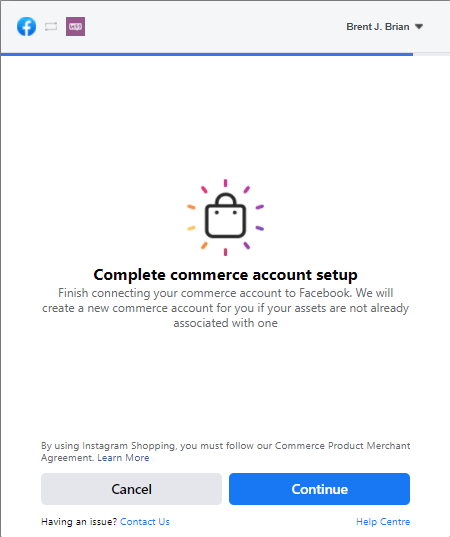
9. Complete Commerce Setup
If linking to Facebook is successful, the final step is done to complete the connection of your WooCommerce store to Facebook. Click on Complete.
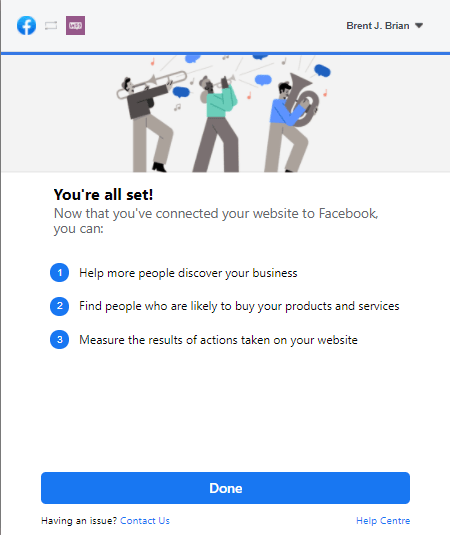
10. Completed
Connecting your store is now complete and you can use the Facebook for WooCommerce features to publish products to Facebook.
Facebook Connection Summary
With the connection completed, the information is displayed in the first tab when accessing Facebook sub-menu item in the Marketing menu for WooCommerce.