Hotmail.com started in the mid-1990s and changed how email was used, providing freedom from being locked into an email address provided by the ISP you used. In 18 months, Hotmail grew to over 8.5 million subscribers when Microsoft bought it.
Over time, Hotmail transitioned to Windows Live Hotmail running on Microsoft technology, and nearly 20 years after Hotmail started, it changed again to Outlook.com running on the Office 365 technology.
Back when Hotmail started, most of us didn’t have our own domain name. Even today, using free email accounts such as outlook.com and gmail.com is a popular option.
So what happens when you get your own new shiny domain name and want to start using an email address with it? You can start new but you may lose your email history and existing contacts may still send emails to your existing outlook.com email address.
You can use your existing Outlook.com account, including if your email address is based on live.com.au or hotmail.com or another email address with your own domain name.
Outlook.com is also a good option if you don’t already have an account. Email accounts can use a lot of space and have all sorts of issues to deal with such as SPAM management. Outlook.com already looks after much of this with lots of free space.
Create a New Outlook.com Account
If you already have an account you want to use then you can skip this step and go to the Forward Your Email step. However, if your existing account is for personal use then it is better to create a new account so emails for business and personal use are not mixed up. Separate accounts will make it easier down the track if you decide to upgrade the account to an Office 365 subscription or change to an alternative service.
Go to https://outlook.live.com/owa/ and click on the Create free account button. If you already have another account you may already be logged in. If so, logout and go back to the same link again if you want to create a new account.
A Create account dialog appears with a choice of outlook.com, outlook.com.au (when accessing from Australia), or hotmail.com. For this guide, we selected @outlook.com.au.
In front of the domain, enter the email address you want to use for your Outlook account. For these types of accounts, I’d recommend using the business name preceded with the name of the email address you will use with your domain name. For example, if you are going to have john@customdomain.com.au, then use john.customdomain@outlook.com.au for your Outlook account.
After selecting an email address for your account, you will need to set a password. Enter the password and click Next. You account is created and you are taken to the Outlook mail web page.
Forward Your Email
Often hosting comes with email hosting as well. WordPress Hosting Packages with Moreton Bay Websites includes cPanel mail which includes forwarding features. As part of the managed hosting packages, we will create email forwarders for you if you provide the details to us.
The instructions below are for configuring email forwarders in cPanel. Chances are the instructions with other hosts are the same or similar. For others, you may need to find details on setting up forwarding with your host.
Go to your cPanel web page for managing your hosting and log in. Go down to the Mail section and click on Forwarders.
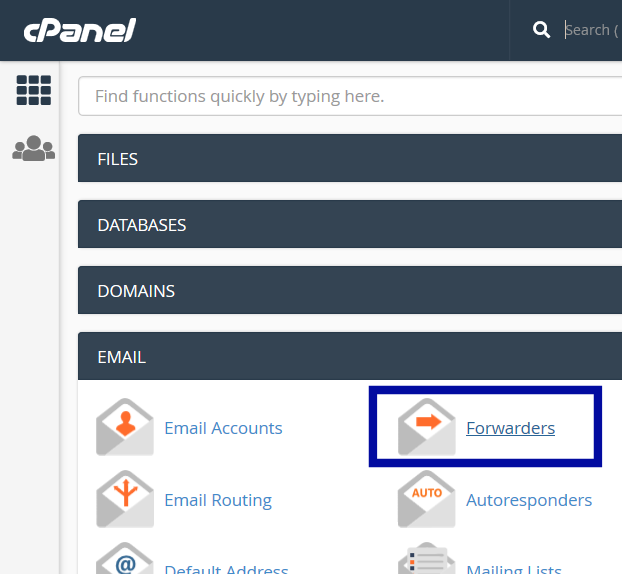
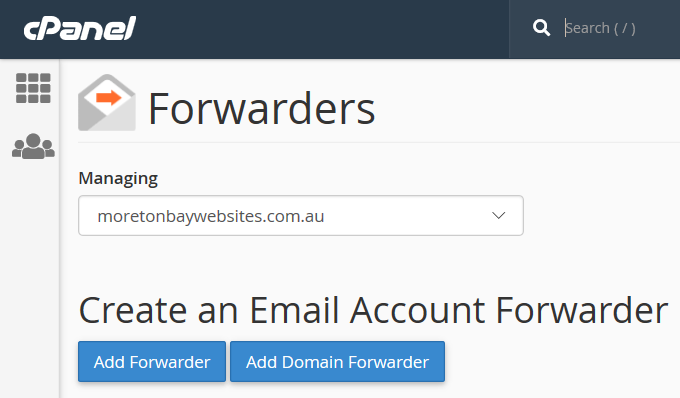
Existing forwarders are shown (if there are any). Click on the Add Forwarder button.
Enter the email address before the @ then select your custom domain name. In the Forward to Email Address under Destination, enter the Gmail email address for using with your custom email address, then click Add Forwarder.
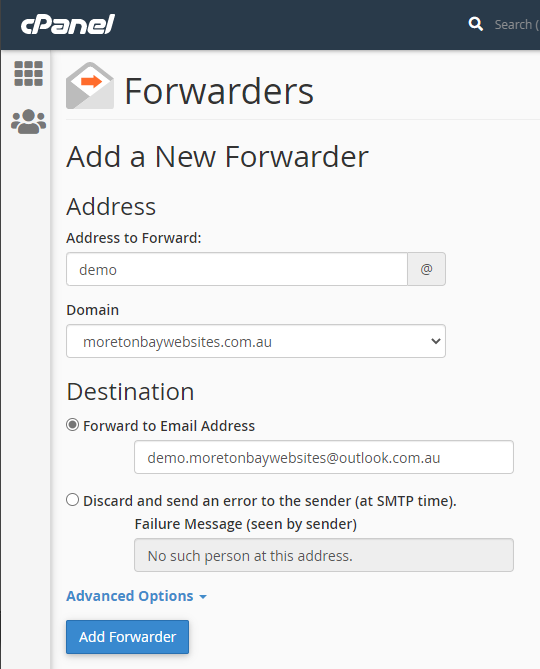
The forwarder is added with a confirmation emails will now be forwarded to the Gmail email address.
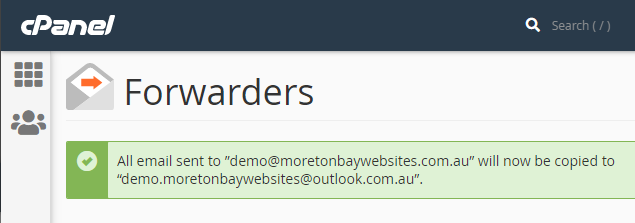
All emails sent to demo@moretonbaywebsites.com.au will now be sent to demo.moretonbaywebsites@outlook.com.au.
Enable Outlook to Use Your Custom Domain

With the email forwarder in place, emails will now come into your Outlook.com email account. However, when we send an email from Outlook.com it will be sent from demo.moretonbaywebsites@outlook.com.au. This step will change the From address to the email address we want shown when we are sending emails.
From the Outlook.com page, click on the Settings icon, represented by a cog, which opens a panel with settings. The panel has the basic and commonly used settings that may be changed frequently.
The settings we need to change are more advanced settings, so we need to open up the full settings options. At the bottom of the panel, click on the link “View all Outlook settings” and a larger settings dialog will appear.
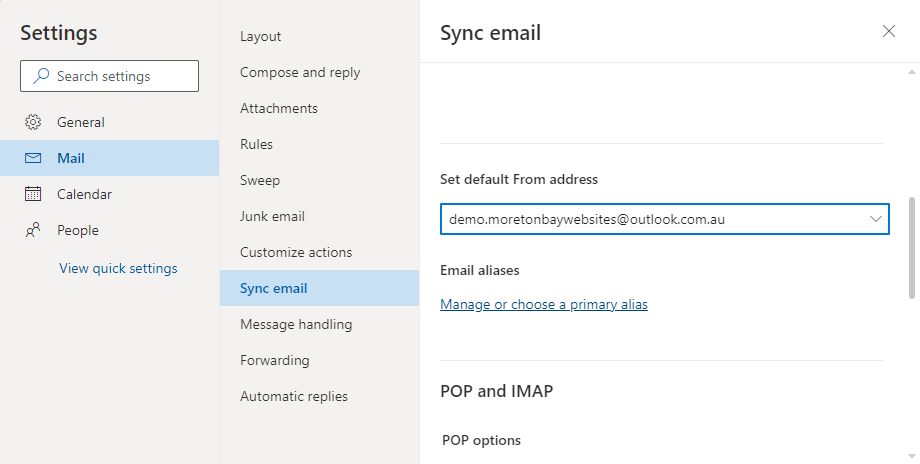
Settings let you change many things but at this time we are only interested in setting the From address, also known as an alias email address.
Click on the Email section on the left, then click on Sync email in the options displayed beside it. Then scroll down to the heading “Email aliases” and click on the “Manage or choose a primary alias” link.
The email alias is not just an email address to use as From in outgoing emails. The alias us also used as an alternative email address to use when signing into your Outlook.com account. This lets you use your own domain name email address for other Microsoft services, such as Skype, OneDrive, and more.
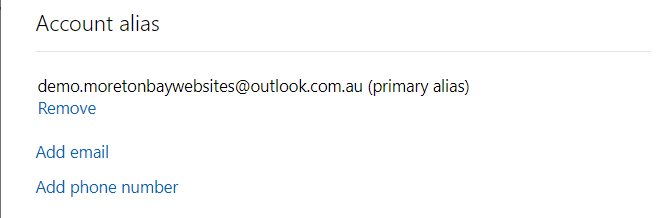
The email address used when creating the Outlook.com account will already be shown under the Account alias heading. If you haven’t previously changed the account alias, it will be the primary alias.
Click on the Add email to create a new alias using your own domain name.
The Add an alias page appears. The first option lets you add additional outlook.com email addresses to use with the same email account. The second option, “Add an existing email address as a Microsoft account alias” is the option we want to use. Select it and enter your email address using your own domain name. In this case, it is demo@moretonbaywebsites.com.au.
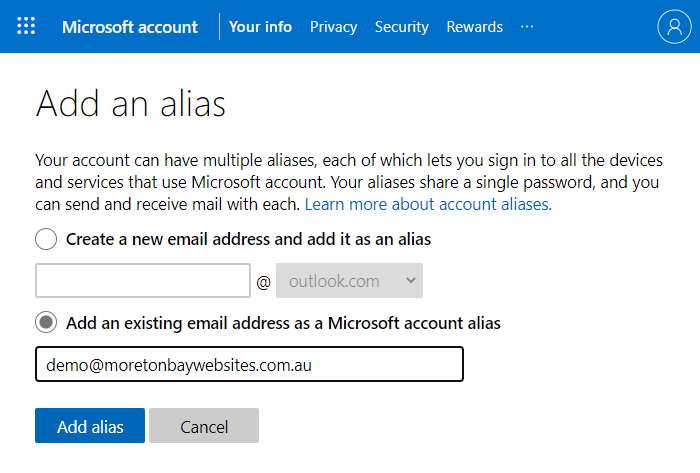
Click on the Add alias button to add your own email address. Because this information is sensitive (you can use the alias to log into your account), you will be asked to enter your password for your Outlook.com account. Enter your password and click Sign in.
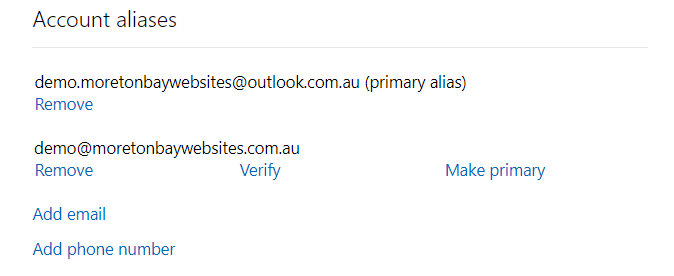
The email address with your domain name will now be shown as an email alias, however, you will need to verify the email address before it can be used.
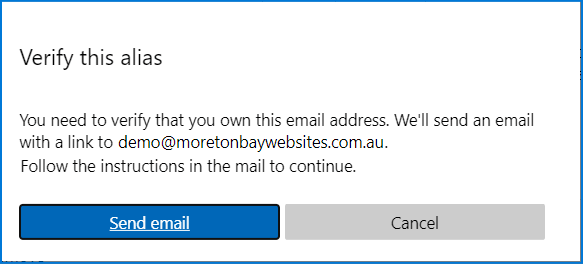
Because the forwarder is in place, the email will be sent to your Outlook.com account. You can open a new browser window and open Outlook.com to view the email and click on the link to verify it.
Return to the Account Aliases list and click on the Make primary link under the email address with your domain name. This tells Outlook.com the email address will be used as the main email address instead of your @outlook.com.au or @hotmail.com email address.
Sending email from Outlook.com will now use the email address with your domain name and your emails will look more professional. Incoming emails will continue to come in for both the old and new emails so you won’t miss anything if your customers don’t update the email address they have for you.